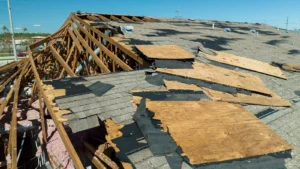
When it comes to roofing, the importance of drip edges is often overlooked by homeowners. Though drip edges are a common feature on homes located in certain areas of the United States, they are not as common in areas that do not experience frequent or severe storms. In addition, drip-edges are sometimes excluded from a project in order to save money. While lacking a drip edge on your roof may save you money in the short-term, it can cause costly damage that will be expensive to fix. As a homeowner, it is important to fully understand how and why a drip edge is used. Here are some of the most common drip edge related questions and answers to be aware of as a homeowner.
What Is a Drip Edge?
A drip edge is a non-staining and non-corroding material applied on a roof’s edge to give water the ability to filter out of the roof system. In other words, it is the metal flashing located at the edge of a roof. A drip edge is installed with an intended tilt, which is specifically meant to direct water away from a roof while assuring the foundation of your roof is not exhausted prematurely by holes or fissures.
Where Should Drip Edges Be Placed?
The correct placement of a roof drip edge is on top of the roof’s exterior cover directly between the sheathing and the fascia board, which forms a drainage gap between the drip edge and the fascia board. As a result, the drainage improves water flow and protects the roof from potential water damage.
Why Is a Drip Edge Important?
Drip edges not only act to preserve the appearance of your roof, but they help shield your property from potential damages:
 Deters insects and other small pests from accessing the space between the fascia board and a deck at the bottom of the roof, which could otherwise give pests the opportunity to enter a home or attic.
- Protects the shingles from potential water damage, which otherwise may cause the roof, deck, and fascia board to erode over time.
- Pushes water away from the fascia and reduces the risk of it eroding over time.
- Helps the gutters to move water away from the house and its base.
- Shields exposed regions from insect and pest infestation.
- Safeguards the edge of a deck from water during rainstorms.
- Guards the underlying roofline against damage in the winter months such as ice and snow damage, which could result in rotting.
- Safeguards the roof from strong gusts of wind and wind-blown rain.
- Shields the fundamental wood and promotes the performance of water-shedding.
- Shields against the occurrence of shifts between a deck and the fascia boards.
- Lengthens the life and the effectiveness of the roofing materials and the roof overall.
 Deters insects and other small pests from accessing the space between the fascia board and a deck at the bottom of the roof, which could otherwise give pests the opportunity to enter a home or attic.
Types of Drip Edges
Hemmed Drip Edge: Applied with metal and standing seam roofing, an open hemmed drip edge will deter water from going upward as a result of capillary action and passing the drip-edge metal.
L Drip Edge: Utilized on low incline roofs, L shape drip edges are situated on the roof deck and atop the fascia board. Prior to installation, the roofing material is fastened tightly with glue to the outside edge.
What are the Installation Requirements?
- Metal Edge Drip: A drip edge has to be resistant to possible corrosion and should be 36 gauge or larger.
- Additional materials: tape measure, hammer, pencil, ladder, small roofing nails, tin snips
- Before you start the installation, remove all dirt and debris from the roof and take the measurements of the exterior edges to determine how much drip edge is required for the project.
 Metal Edge Drip: A drip edge has to be resistant to possible corrosion and should be 36 gauge or larger.
How to Properly Install a Drip Edge
Cut Lengths: Use a metal snip to divide the portions of the drip edge in accordance with your measurements. With the first section, place the strip toward the edge of the fascia at the point where the titled border reaches the parallel side. Note the slope’s angle with a pencil and cut it to align so it will be easy to level with the edge upon fitting.
Begin Installation
It is best to install a drip edge on a day with warm weather because it makes it easier for the shingles to be stripped back. Begin at the lower corner of the roof and gradually progress to the top. Raise the shingles and push the top rim of your drip edge beneath them. Tack the end into position with the roofing nails and press the nail within the drip edge and into the roof covering. But do not push it through the fascia. Arrange the shingles back into position as you continue along.
Overhang Joints
As you get to the end of a piece, begin the following division with lap joint. To produce this, overlay the ends of a drip edge with the upper end above the lower edge to cause flowing water to go over the joint rather than veer underneath it. Resume this procedure until the drip edge metal pieces are located on all the roof’s edges, including the front, rear, and side sections.
Why Is the Gap Important?
If there is a gap resulting from an unsuccessful overlay, it may result in water flowing behind the edge instead of into the gutter. This is known as back flowing gutters, which can cause water damage to your home and roof system. If you run into issues with the overlap and need to resolve the gap, review the following tips:
- If the overlap is too short, fix it by placing drip edge under the first row of roof shingles and be sure that the exterior edge is reaching over the gutter.
- If the gutter is lower than the bottom edge of the drip edge, install flashing behind the drip edge and over the back edge of the gutter to remove the gap.
When you choose a reliable roofing contractor, you can feel confident that you are getting the work done right the first time. Here at Mr. Roof, we want you to feel confident that you are in good hands, so we offer one of the best warranties in the industry. Sign up today, to get a free estimate!